
I’m pretty sure I am not the only one with a drawer around the house or shop that couldn’t benefit from some better organization. The inspiration for this project came from one particular kitchen drawer. This drawer is just a disaster of different kitchen utensils. In order to find the thing I want, I need to rummage around in there, and I’m tired of it. I needed to come up with a solution that would keep things better organized and also be simple and fun to make.
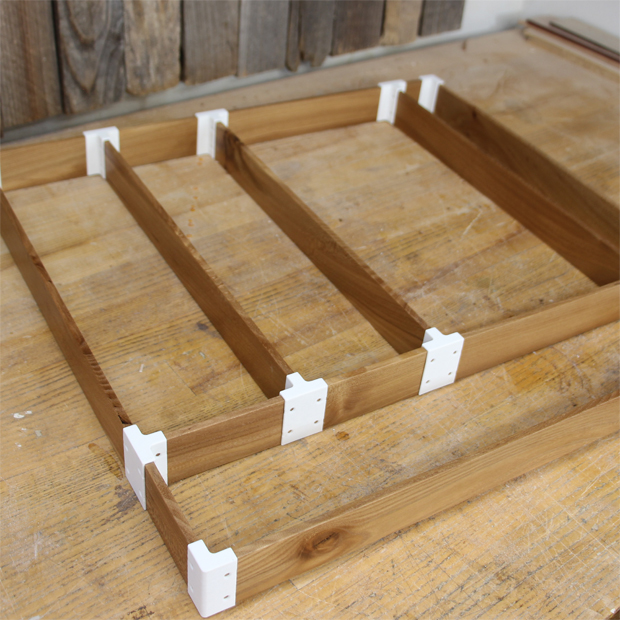
I sat down at the computer and designed a set of brackets that could be 3D printed. These brackets will connect some 1/4″ thick wooden strips in any configuration you can imagine.
To make the strips I used some Elm that I milled on my chainsaw mill a year or 2 ago. It had been planed down but was not yet to final thickness. I used a straightedge to mark a line along the live edge so I could cut that off on my bandsaw. After a couple passed on the jointer, I ripped the stock into strips that were 1 3/4″ wide. Next I sent the pieces through my drum sander to get them to the final 1/4″ thickness.After a bit of measuring I can now begin to cut the strips into their individual pieces using my crosscut sled.
I found it to be really easy to do this by assembling the organizer right into the drawer. I could take my measurements, make the cut and put it together. Once I had everything cut, I disassembled it all and lightly sanded the parts before applying a couple coast of satin spray lacquer. Now in hindsight, it would have been easier to finish these before I sliced them into smaller parts. Then I could have assembled it and been done. There would have been a lot less sanding had I done it that way.
After the finish was dry, I reassembled the organizer and its ready to go. I ended up not needing to use any screws or glue on my organizer. The parts fit together great and the whole thing is quite rigid. Plus, once it in the drawer, it really can’t come apart anyway. If you do need to secure the pieces, there are some small holes in the brackets to allow for small wood screws, or you could use a little CA Glue (I recommend Starbond Glues. Save 10% by visiting this link and using code HomeBuilt10 at checkout), Epoxy or even wood glue, to secure the pieces.
Overall, this is a pretty easy project and I’m really happy with it. Its super customizable and can be used in a ton of different ways. If you have your own 3D Printer and you’d like to print your own brackets, I have the .stl files available to you for free. If you dont have a printer and would still like to make an organizer like this, I will offer pre-printed sets of these brackets available on my website. You can go here to check those out.
Thanks for stopping by.
— Affiliate Links to Products Used —
Creality Ender 3 v2 Printer – https://amzn.to/3eKSp5P
Hatchbox PLA White Filament – https://amzn.to/3y3w1vW
— Here are some other videos you might enjoy —