
Who Doesn’t love Barbecues and Grilling? I know I do. Every time I cook out, I feel like I need another spot to set things down. There’s never enough space. I have come up with an easy solution to that problem.
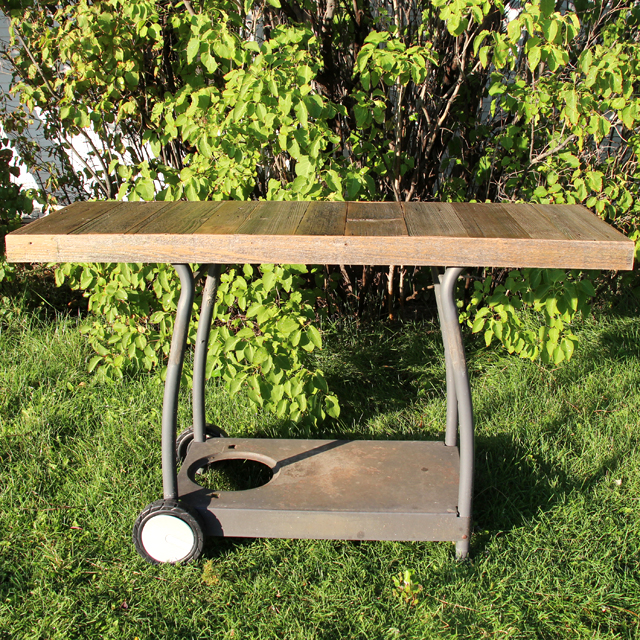
I’ll begin with a metal frame that I saved from an old grill that was bound for the trash. ITs nothing fancy, but it will serve as a great base for my new table. It already has wheels and although they’re not great, they will work fine for this project. I have seen several grills with this style base available for free online, so it shouldn’t be too tough to find one similar. I didn’t do anything to the base. It works great just as it is.
For the top, I’m using some reclaimed Cedar fence pickets. I began by running them through my planer to clean up the back side. This gave me a nice flat and clean surface to work with. I didn’t plane the front. I wanted to retain the weathered look. Next I cut most of the pieces down to size, this included ripping some narrower strips that would make up the rectangular frame.
To assemble the frame, I cut 45 degree angles on the corners, then cut a small rabbet on the inside edge using my router table and a straight cutting bit. This gave me a channel that would hold the slats for the top. Using some Titebond 3 waterproof glue, I glued up the frame and secured it with some pin nails. The pin nails aren’t for strength, but to hold the frame together until the glue dries. It allows me to keep working while the glue is wet. Once the frame was dry, I glued and pinned all the slats in place. The very last small slat, I had to custom fit to the space. This only required a few swipes with my Restored Stanley #4 Hand Plane. Click Here is you want to see how I restored it. The last pieces I needed to attach were some strips on the bottom side. These were to build up the thickness so that when I drive the screws in to attach the top, there was enough wood there. Now to let it all dry.
Once the glue was dry, I could get some finish on the tabletop. I first gave it a good sanding to remove about a million splinters. I was careful though, not to remove too much of that weathered grey wood. With it nice and smooth, I applied several coats of water based, Spar Urethane. This should give it good protection from the elements. All that’s left to do is attach the top to the grill base. I just used some short galvanized screws and the cart is complete.
I’m very happy with how this turned out. I could have made it much fancier, or included other elements in this table, but I wanted a nice simple table. I didn’t really need all the bells and whistles for this project. Thats for another project.
Thanks for watching.
___ Affiliate Links to Products Used —
Titebond 3 Waterproof Glue – https://amzn.to/2O4ofhb
23 Gauge Pin Nailer – https://amzn.to/2LzVGXt
Minwax, Water Based Satin Polyurethane – https://amzn.to/304fBXd
Corner Clamp – https://amzn.to/30nK4ei