
Remember when I almost froze to death while changing my jointer knives? That was rough. Now its time for me to re-purpose those into a new marking knife. Ready? Lets Go.
I’ll begin this projects by marking out on the blade, where I want to remove some material. I’m just roughing out a shape that looks good to me. There’s no template for the knife I’m making. Now on to the belt grinder, where I have a 60 grit belt installed. I’ll begin removing metal until I reach my desired shape. Since I know some portion of this blade is already hardened, I’m being very careful to not overheat the blade. In order to keep the heat under control, I’m frequently dunking the piece in water. It it gets too hot, it can remove the temper from the blade and I’d have to try to heat treat it again. I’m trying my best to avoid that.
Once I have the shape ground, its time to drill for the wooden pins. After marking out a center line, I’ll begin drilling. This is where I ran into a problem. Before I began this process, I tested a drill bit on one of the knives to see if I could drill it. It appeared to drill just fine so I assumed it was hardened on the tip of the knife. Turns out half of the blade is hard on only one side. As soon as I started to drill it, the drill bit hit the hardened piece and all drilling progress stopped. As a result, I would have to make a design modification, and do a hidden tang handle.
I grabbed a scrap of figured maple, and cut 2 scale pieces on the band saw. Using my router table, I routed a shallow groove inside each half of the handle. The groove was exactly half the thickness of the blade. This would allow the handle to completely wrap around the knife. Before I glued it on, I did some initial shaping of the wood on the belt grinder. Now, I mixed up some slow setting epoxy, and glued the handles to the blade, and let it cure overnight.
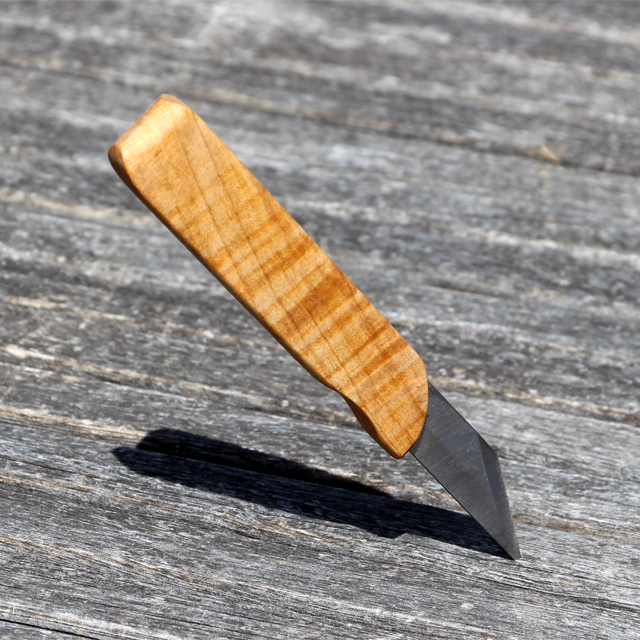
Now is the fun part. Shaping the handle. Back to the belt grinder, I began shaping the handle so it was comfortable for me. Again, no template. I just started shaping the areas I felt needed to be shaped. After some final hand sanding, I applied a couple of coats of Boiled Linseed Oil. This made the grain really pop on the curly maple.
This little knife turned out really cool, and after a final sharpening on a leather strop, its as sharp as anything. Now I need to make a sheath for it so I don’t stab myself. Check out the build video below.
— Afilliate Links to Products Used —
TotalBoat Epoxy – https://amzn.to/2GmVg44
Irwin Clamps – https://amzn.to/2UjUnga
Spring Clamps – https://amzn.to/2X7jR24
Acetone – https://amzn.to/2VLB0Oy
Red Sharpies – https://amzn.to/2DelmUZ
3M Respirator – https://amzn.to/2GjU5kK
Mechanics Gloves – https://amzn.to/2Ikzkc0
Here’s the Jointer Knife video if you haven’t seen it. https://youtu.be/S5p8S5IotZI